IoT Weather Station – NodeMCU & NodeRed
As a weekend project, while I was bored out of my skull, I grabbed a couple of sensors trying to make something of a NodeMcu board I had lying around.
So I made a quick(yeah I know, ugly) schematic using the best in a rush schematic drawing application…Microsoft Paint !!

Then I made it happen and started coding.
I’ll add an LCD, but I have to order a power supply anyway. The whole idea is to turn it on, it connects to wifi and show the IP on the LCD.

Now, how would I allow the user to mod the SSID and pass…well..
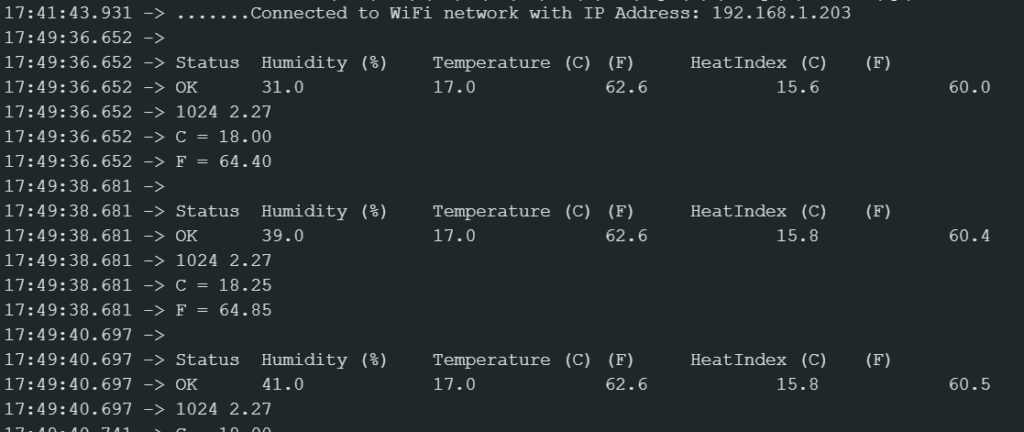
Anyway, in the mean time, I made it provide custom data from the sensors to the NodeRed instance.
I use a max6675, a DHT11 and a photo-resitor.
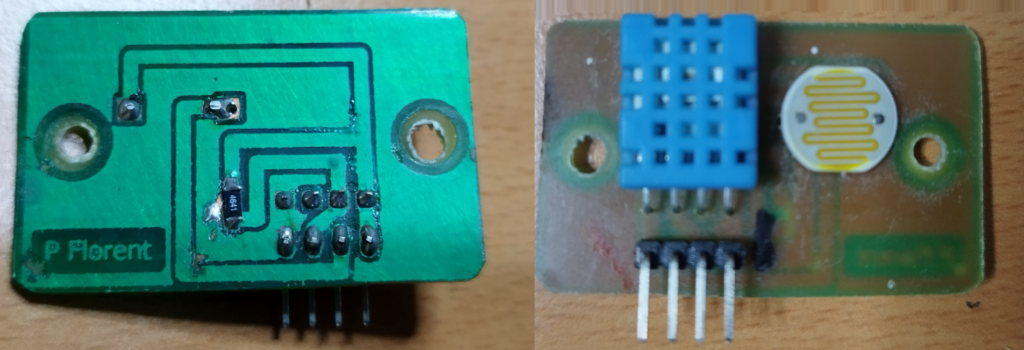
Here we can admire a small board I built myself (it even has solder mask and my name on it 🙂 )
Here is the Arduino IDE compatible NodeMcu code for this appliance.
/*
Weather Station using NodeMCU and NodeRed
Philippe Florent 2022

This program is free software: you can redistribute it and/or modify
it under the terms of the GNU General Public License as published by
the Free Software Foundation, either version 3 of the License, or
(at your option) any later version.

This program is distributed in the hope that it will be useful,
but WITHOUT ANY WARRANTY; without even the implied warranty of
MERCHANTABILITY or FITNESS FOR A PARTICULAR PURPOSE.  See the
GNU General Public License for more details.

You should have received a copy of the GNU General Public License
along with this program.  If not, see <https://www.gnu.org/licenses/>.

 - install nodered
 - launch it with .node-red
 - browse http://127.0.0.1:1880/ui
 - setup : http://127.0.0.1:1880/
*/

//----------- http
#include <ESP8266WiFi.h>
#include <ESP8266HTTPClient.h>
#include <WiFiClient.h>

//----------- sensors
#include "DHTesp.h"
#include "max6675.h"

//------- MAX6675
int thermoDO = 12;
int thermoCS = 15;
int thermoCLK = 14;

MAX6675 thermocouple(thermoCLK, thermoCS, thermoDO);

//-----photores
#define PhotoresistorPin A0 // for Arduino microcontroller

//-------- dht
#define DHTpin 0    //D3 of NodeMCU is GPIO0
DHTesp dht;

//----------- http

const char* ssid = "";
const char* password = "";

//Your Domain name with URL path or IP address with path
const char* serverName = "http://192.168.***.***:1880/update-sensor";

unsigned long lastTime = 0;
unsigned long timerDelay = 100; // ms

void setup() {
  Serial.begin(115200);

  //---------sensors
  dht.setup(DHTpin, DHTesp::DHT11); //for DHT11 Connect DHT sensor to GPIO 17

  pinMode(PhotoresistorPin,INPUT); // photoresistor

  //------- MAX6675
  // wait for MAX chip to stabilize
  delay(500);

  //------- http
  WiFi.begin(ssid, password);
  Serial.println("Connecting");
  while(WiFi.status() != WL_CONNECTED) {
    delay(500);
    Serial.print(".");
  }
  //Serial.println("");
  Serial.print("Connected to WiFi network with IP Address: ");
  Serial.println(WiFi.localIP());
  lastTime = millis();

}

void loop() {

  //--------- dht11
  delay(dht.getMinimumSamplingPeriod());

  float humidity = dht.getHumidity();
  float temperature1 = dht.getTemperature();
  float temperature1F = dht.toFahrenheit(temperature1);
  float temperature1Index = dht.computeHeatIndex(temperature1, humidity, false);
  float temperature1FIndex = dht.computeHeatIndex(dht.toFahrenheit(temperature1), humidity, true);

  Serial.println();
  Serial.println("Status\tHumidity (%)\tTemperature (C)\t(F)\tHeatIndex (C)\t(F)");
  Serial.print(dht.getStatusString());
  Serial.print("\t");
  Serial.print(humidity, 1);
  Serial.print("\t\t");
  Serial.print(temperature1, 1);
  Serial.print("\t\t");
  Serial.print(temperature1F, 1);
  Serial.print("\t\t");
  Serial.print(temperature1Index, 1);
  Serial.print("\t\t");
  Serial.println(temperature1FIndex, 1);

  //----------- photo res
  int analog_value = analogRead(PhotoresistorPin);
  //int brightness = map(analog_value, 0, 1023, 0, 99);
  //#define MAX_BRIGHTNESS_VOLTAGE 2.269
  //#define BRIGHTNESS_RATIO = (MAX_BRIGHTNESS_VOLTAGE / 1023.0f)
  //float brightness=((float)analog_value)*BRIGHTNESS_RATIO;
  float brightness=((float)analog_value) / 1023.0f;
  brightness=brightness*100;
  Serial.print(analog_value);
  Serial.print(" ");
  Serial.println(brightness);
  delay(10);

  //------- MAX6675
  float temperature2=thermocouple.readCelsius();
  float temperatureF2=thermocouple.readFahrenheit();
  Serial.print("C = ");
  Serial.println(temperature2);
  Serial.print("F = ");
  Serial.println(temperatureF2);
   // For the MAX6675 to update, you must delay AT LEAST 250ms between reads!
  delay(1000);

  if ((millis() - lastTime) > timerDelay) {
    //Check WiFi connection status
    if(WiFi.status()== WL_CONNECTED){
      WiFiClient client;
      HTTPClient http;

      // Your Domain name with URL path or IP address with path
      http.begin(client, serverName);

      // If you need Node-RED/server authentication, insert user and password below
      //http.setAuthorization("REPLACE_WITH_SERVER_USERNAME", "REPLACE_WITH_SERVER_PASSWORD");

      // If you need an HTTP request with a content type: application/json, use the following:
      http.addHeader("Content-Type", "application/json");
      String post="{\"api_key\":\"tPmAT5Ab3j7F9\",\"humidity\":\""+String(humidity)+"\",\"temperature1\":\""+String(temperature1)+"\",\"temperature1F\":\""+String(temperature1F)+"\",\"temperature1Index\":\""+String(temperature1Index)+"\",\"temperature1FIndex\":\""+String(temperature1FIndex)+"\",\"brightness\":\""+String(brightness)+"\",\"temperature2\":\""+String(temperature2)+"\",\"temperatureF2\":\""+String(temperatureF2)+"\"}";
      Serial.println(post);
      int httpResponseCode = http.POST(post);

      // If you need an HTTP request with a content type: text/plain
      //http.addHeader("Content-Type", "text/plain");
      //int httpResponseCode = http.POST("Hello, World!");

      Serial.print("HTTP Response code: ");
      Serial.println(httpResponseCode);

      // Free resources
      http.end();
    }
    else {
      Serial.println("WiFi Disconnected");
    }
    lastTime = millis();
  }
}
NodeRed gets started as any node.js app

It allows to create a dashboard in a WYSIWYG way.
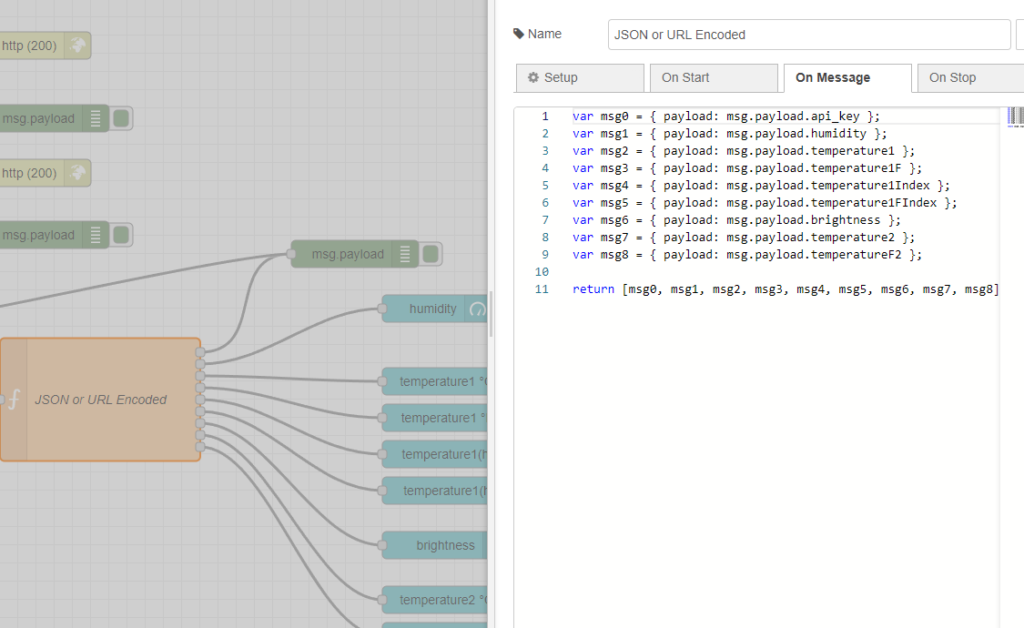
And provides enough tweaking and options so that one can easily pipe the data flow to something graphically readable.

So in the end, I get a “nice” UI. I mean it’s not great but I did not have to code anything. TADAAA !!

Sources :
Interfacing DHT11 with NodeMCU Example Resistor Tutorial for Arduino, ESP8266 and ESP32 ESP8266 NodeMCU: K-Type Thermocouple with MAX6675 Amplifier How to Interface PCF8574 I2C LCD with ESP8266 NodeMCU?https://create.arduino.cc/projecthub/arcaegecengiz/using-dht11-b0f365